King Performance Billet Distributor Kit — 8.8mm Wires & High-Output Coil | VW Air-Cooled
King Performance Billet Distributor Kit — 8.8mm Wires & High-Output Coil | VW Air-Cooled
Couldn't load pickup availability
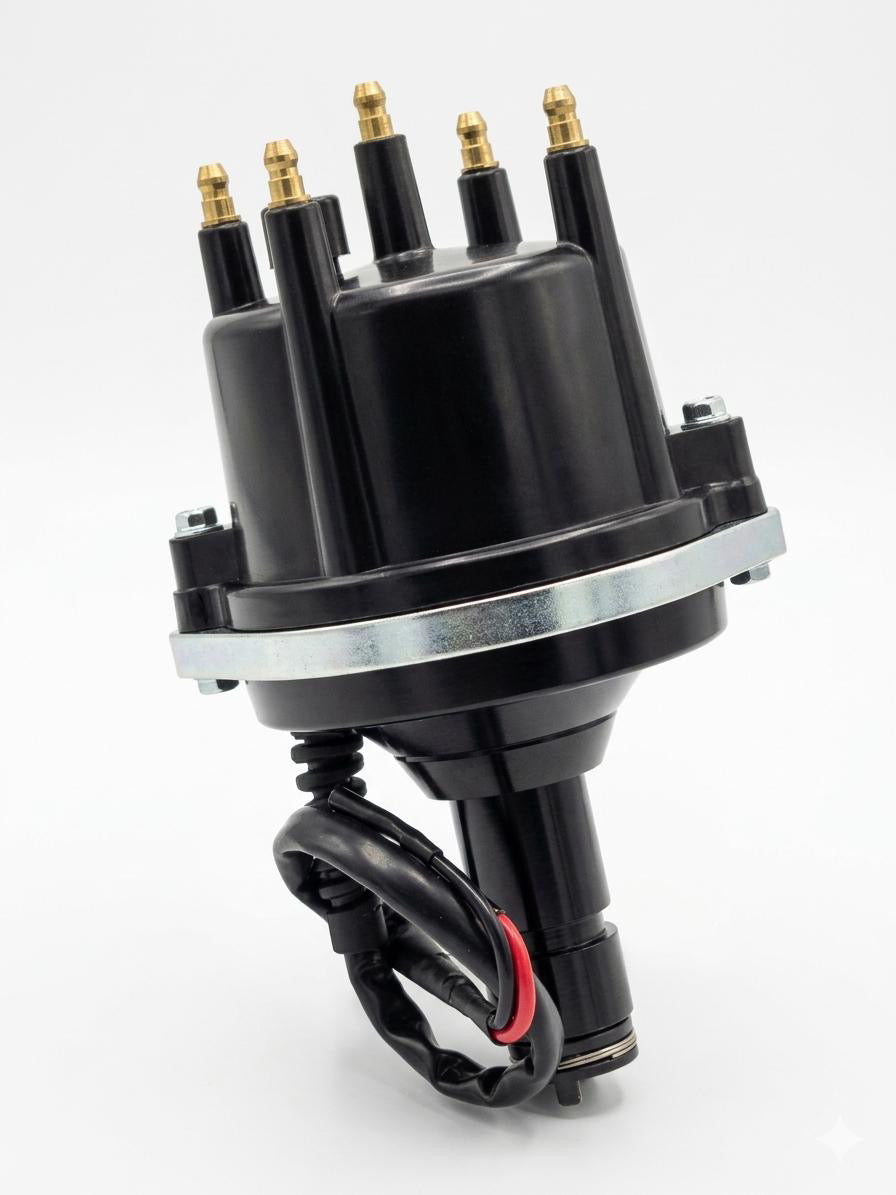
King Performance Billet Digital Ignition Kit - VW Air-Cooled
Upgrade your air-cooled engine's reliability and performance with the King Performance Billet Digital Ignition Kit. This comprehensive kit eliminates the maintenance headaches of traditional points systems, providing a rock-solid, high-energy spark that improves starting, idling, and top-end power.
At the heart of the kit is a precision-machined billet aluminum distributor, featuring a modern digital integrated circuit. Unlike cast housings, this billet body offers superior heat dissipation and structural integrity. The internal centrifugal advance is fully adjustable, allowing you to fine-tune your timing curve for street or performance applications.
To ensure that spark actually reaches the plugs without voltage leak, we've included a set of 8.8mm high-performance silicone spark plug wires. These wires feature low-resistance spiral cores and heavy-duty boots designed to fit perfectly in VW engine tin. The kit is rounded out with a King Performance high-output ignition coil and a complete hardware installation pack, including a billet distributor clamp and advance springs.
Key Features
-
Precision Billet Housing: CNC-machined aluminum for perfect fitment and long-term durability.
-
Digital Accuracy: Maintenance-free magnetic pickup replaces unreliable points and condenser.
-
8.8mm Spiral Core Wires: Maximum insulation and RFI suppression for clean, powerful spark delivery.
-
Adjustable Advance: Comes with multiple spring rates to customize your mechanical advance curve.
-
Complete Kit: Includes distributor, 8.8mm wires, high-output coil, billet clamp, and mounting hardware.
This guide outlines the standard installation process for the King Performance Billet Digital Ignition Kit. Before beginning, ensure your engine is at Top Dead Center (TDC) on the compression stroke for Cylinder #1 to maintain proper timing.
Pre-Installation Prep
-
Safety First: Disconnect the negative battery terminal.
-
Mark Your Wires: Note the position of your current spark plug wires (1-4-3-2 firing order) and the orientation of the vacuum port or electrical wires on your existing distributor.
-
TDC Alignment: Rotate the engine by hand until the timing notch on the crank pulley aligns with the "0" mark on the case and the rotor points toward the #1 cylinder notch on the distributor rim.
Step 1: Remove the Old Distributor
-
Disconnect the wires from the coil and the distributor.
-
Loosen the 13mm nut on the distributor hold-down clamp.
-
Pull the old distributor straight up and out of the engine block.
-
Note: Take a look at the "drive tang" at the bottom of the distributor. Ensure the drive gear inside the engine did not lift out.
Step 2: Install the King Performance Billet Distributor
-
Apply a small amount of engine oil to the O-ring on the new billet housing.
-
Align the drive tang on the bottom of the distributor with the slot in the engine’s drive gear.
-
Seat the distributor into the block. The rotor should now be pointing toward the #1 terminal position (roughly 4 o'clock on a Type 1 engine).
-
Slide the provided billet distributor clamp over the neck and lightly snug the bolt—do not tighten fully yet, as you will need to rotate it for timing.
Step 3: Mount the Coil and Hardware
-
Install the King Performance Coil in the factory location.
-
Connect the Red wire from the distributor to the Positive (+) terminal on the coil.
-
Connect the Black wire from the distributor to the Negative (-) terminal on the coil.
-
Connect your switched 12V power source (usually from the ignition switch) to the Positive (+) side of the coil.
Step 4: Install the 8.8mm Spark Plug Wires
-
Snap the 8.8mm wires onto the distributor cap. Ensure they are seated firmly on the brass terminals.
-
Route the wires through the engine tin to the spark plugs.
-
Pro Tip: Use the provided wire separators to keep the 8.8mm lines away from hot exhaust components or sharp metal edges.
-
-
Follow the 1-4-3-2 firing order in a clockwise direction starting from Cylinder #1.
Step 5: Setting the Timing
-
Reconnect the battery.
-
Using a timing light, start the engine. Rotate the distributor body slowly until you reach your desired timing (typically 7.5° to 10° BTDC at idle for most air-cooled builds, or 28° to 32° total advance at 3,000 RPM).
-
Once timed, tighten the billet clamp bolt securely.
Maintenance Note
This kit uses a magnetic pickup, so there are no points to gap. However, if you wish to change the advance curve, you can swap the internal springs using the hardware provided in the kit. Simply remove the cap and rotor to access the advance mechanism.
#E35
Share